Post Installation Setup
Installing IDA BAW Toolkit
The testing capability can only launch the exposed Business Processes, Human Services, and AJAX Services. If you wish to test other services such as system services, integration services, or business processes which are not exposed directly, you need to install the IDA Toolkit.
| BAW Version | IDA Toolkit Version |
|---|---|
| 19.0.0.3 | IDA_Toolkit-8.6.1.19003.twx |
| 20.0.0.1 | IDA_Toolkit-8.6.2.20001.twx Due to product limitations, this version does not support executeSQL. |
| 20.0.0.2+ | IDA_Toolkit-8.6.2.20002.twx |
-
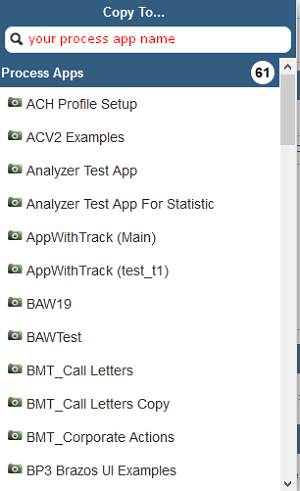
Import the corresponding IDA_Toolkit-8.6.x.x.twx from IDA Resources page into your process center.
-
Open your process app by the web process designer from the process center.
-
Click the + button after Toolkits.
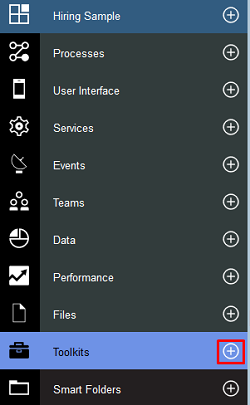
- Type ida in the search box and select 8.6.x.0 below IDA Toolkit. Then the dependency IDA Toolkit(8.6.x.0) is added.
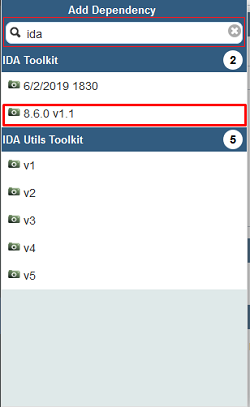
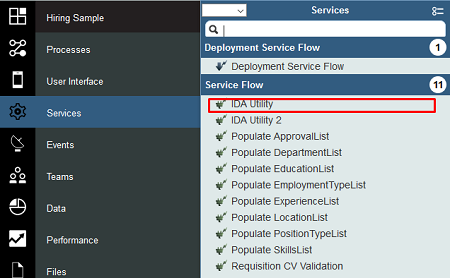
- Click Services below IDA Toolkit(8.6.x.0). Right-click the IDA Utility service flow and copy the item to your process app.
- If IDA Utility is in the Services of your Process app, the service is installed successfully.
- Modify toolkit access permission (Optional)
For security concerns, we suggest disabling the toolkit in the BAW production environment. It allows the user to modify the toolkit access permission by setting up the environment variable “IDA_ACCESS”. (true means enable the access, false means disable the access)
By default, the toolkit can only be invoked on Development, Test, and Stage environments:

You can define the same environment variable “IDA_ACCESS” in your BAW application which will override the default setting in the toolkit, for example:

Installing IDA Browser Plug-in
Chrome plugin
Chrome plugin v3
- Open the url https://chromewebstore.google.com/detail/ida3/okfjgkfpccchnedafbkkijfjbfhhjkdf
- Click “Add to Chrome” button to install plug-in.
- The Chrome plugin offline installation package: ida3-25.2.crx can be downloaded from IDA Resources page.
- For Chrome plugin to work on IDA web version >= 22.1.1, please configure the cookieSameSite attribute of http session on liberty server.xml or WAS console.
Edge plugin
- The same IDA Chrome plugin can also be installed in Edge.
- Enable “Allow extensions from other stores.” in the Edge Extensions settings page.
- Open the url https://chromewebstore.google.com/detail/ida3/okfjgkfpccchnedafbkkijfjbfhhjkdf(for plugin v3) or https://chromewebstore.google.com/search/IBM%20IDA(for plugin v2)
- Click “Get” button, then click “Add extension” button to install plug-in.
Firefox plugin
- Download Firefox plugin ida-25.2.xpi from IDA Resources page.
- Drag the downloaded plugin file into firefox window.
- Click “Add” button.
Plug-in Configuration
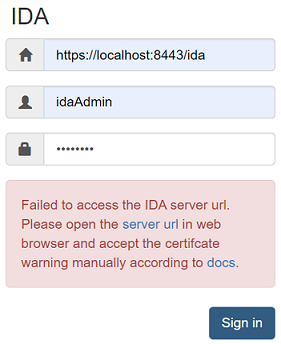
To make the plug-in work, you must log in to the IDA server in the plugin login page.
-
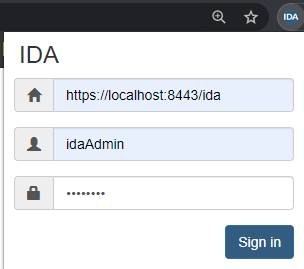
Click the IDA plugin icon in the browser extension toolbar, then it will pop up the login window.
-
Enter the IDA server URL, username, and password.
-
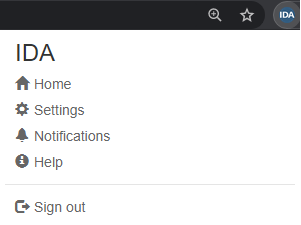
Click the “Sign in” button, then you will see the screenshot as below.
-
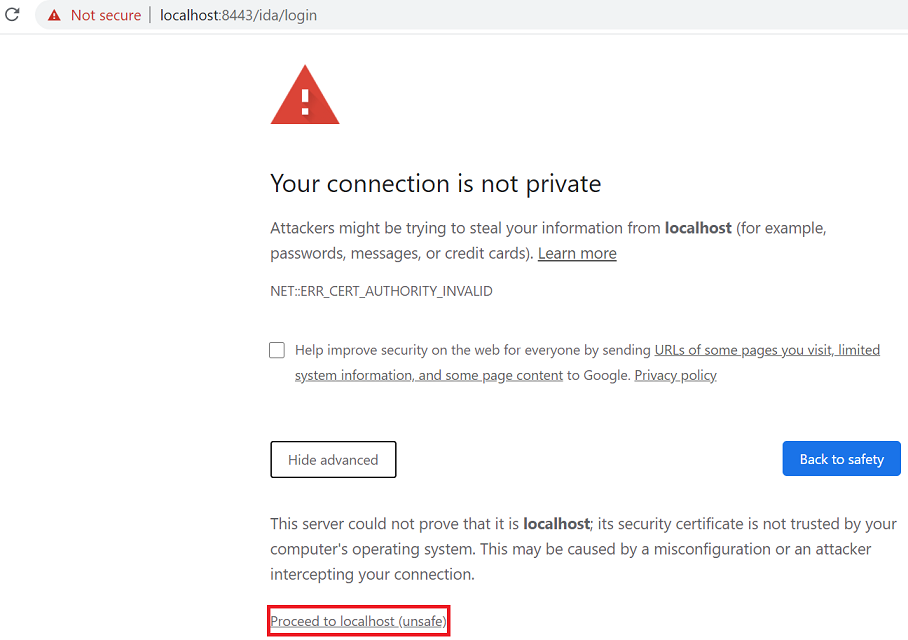
If you see the below sign-in errors, please open the server URL in your web browser to verify that IDA web can be accessed. If IDA web shows an HTTPS/SSL certificate warning, you must accept the warning manually by clicking “Proceed to …” and then sign in to the IDA plugin.
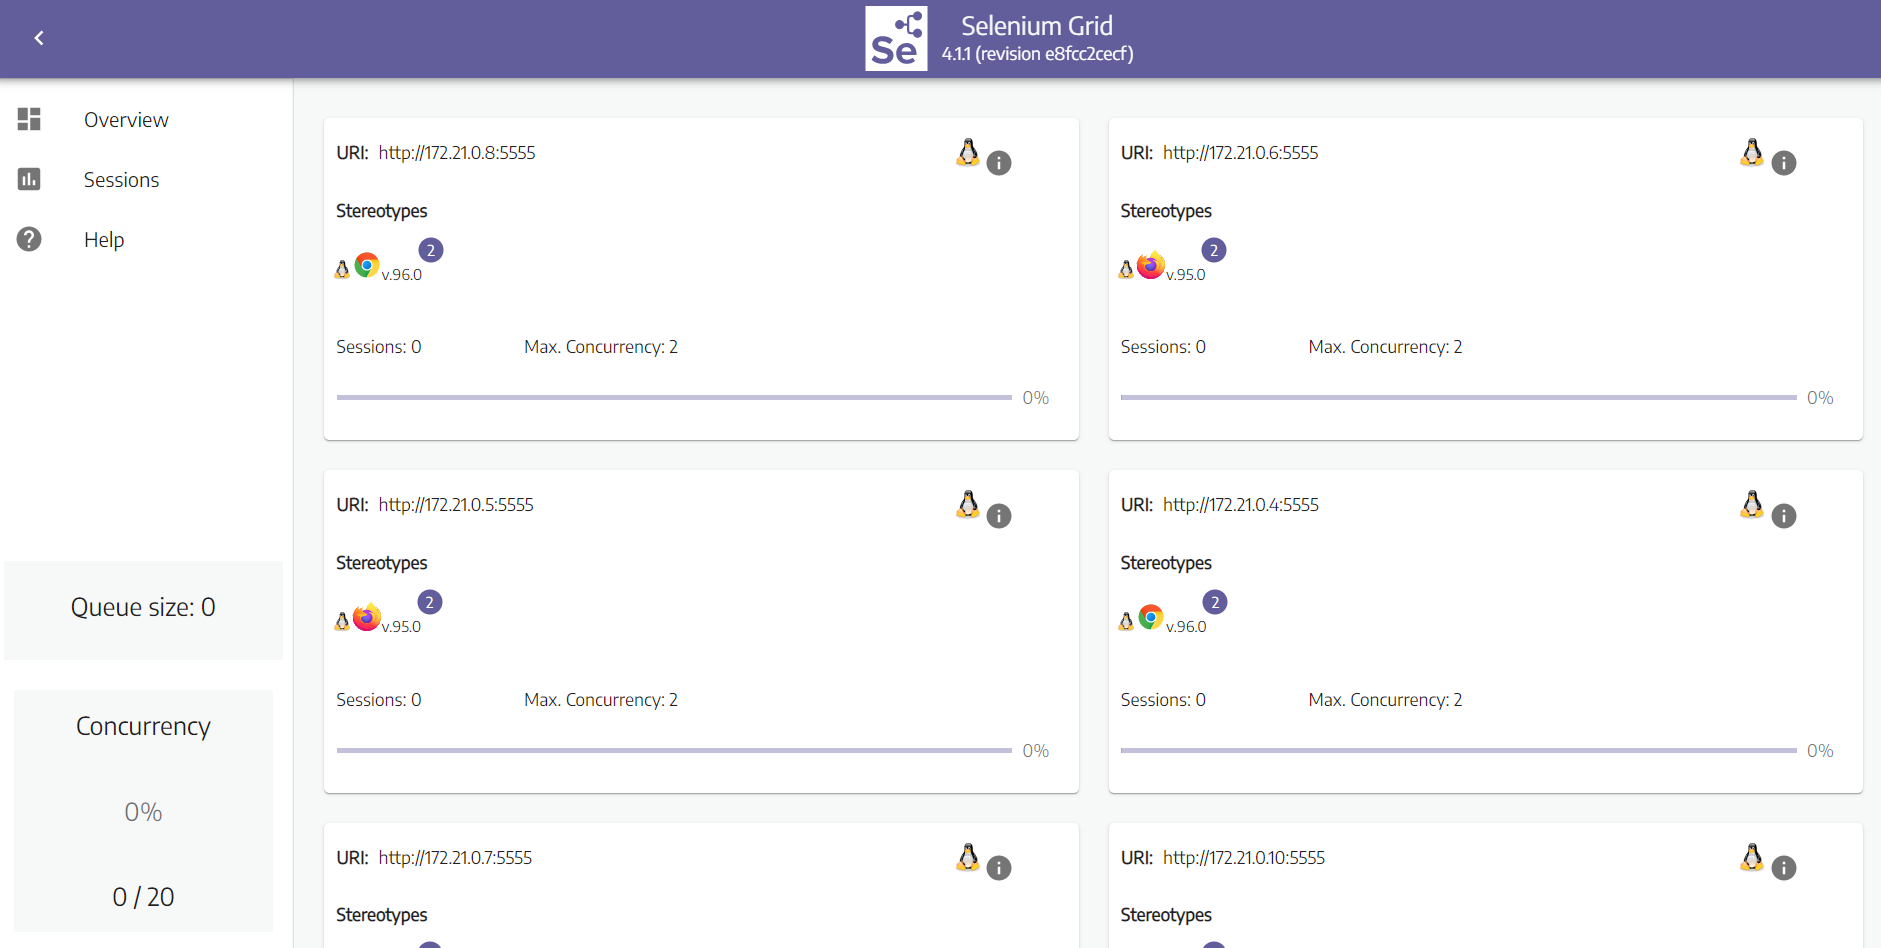
Installing Selenium Grid Server
IDA integrates with a remote testing automation framework based on Selenium Grid. IDA supports both version 4 and version 3 of Selenium Grid.
Selenium Grid Sizes
Choosing a Grid role depends on what operating systems and browsers need to be supported, how many parallel sessions need to be executed, the number of available machines, and how powerful (CPU, RAM) those machines are.
Creating sessions concurrently relies on the available processors to the Distributor. For example, if a machine has 4 CPUs, the Distributor will only be able to create up to 4 sessions concurrently.
By default, the maximum number of concurrent sessions a Node supports is limited by the number of CPUs available. For example, if the Node machine has 8 CPUs, it can run up to 8 concurrent browser sessions (with the exception of Safari, which is always one). Additionally, it is expected that each browser session should use around 1GB RAM.
In general, it is recommended to have Nodes as small as possible. Instead of having a machine with 32 CPUs and 32GB RAM to run 32 concurrent browser sessions, it is better to have 32 small Nodes in order to better isolate processes. With this, if a Node fails, it will do so in an isolated manner. Docker is a good tool to achieve this approach.
Note that the default values (1 CPU/1GB RAM per browser) are a recommendation and may not apply to your context. It is recommended to use them as a reference, but measuring performance continuously will help determine the ideal values for your environment.
Grid sizes are relative to the number of supported concurrent sessions and the number of Nodes, and there is no “one size fits all.” It is suggested to start with a small grid size, which contains 5 or fewer nodes. More nodes can be added in the future according to actual requirements.
Installing Selenium Grid v4
Notes
Selenium Grid 4 can be set up in several modes: Standalone/Hub and Node/Distributed/Docker. For varied configuration details, please check the Selenium documentation below.
Local installation
- Download the Selenium server jar selenium-server-4.10.0.jar.
- Download Selenium web drivers and put them under the same folder as the Selenium server jar file.
- To quickly start Selenium 4 in standalone mode with default configurations, run the command below. This will set up a 1-node hub with auto-detected web drivers in the same folder as the jar file.
java -jar selenium-server-4.10.0.jar standalone
- To start Selenium 4 in Hub and Node mode with customized node configuration,
- create a config.toml file with the configuration below.
[node]
detect-drivers = false

[[node.driver-configuration]]
display-name = "Firefox"
max-sessions = 5
stereotype = "{\"browserName\": \"firefox\"}"

[[node.driver-configuration]]
display-name = "Chrome"
max-sessions = 5
stereotype = "{\"browserName\": \"chrome\"}"

[[node.driver-configuration]]
display-name = "Edge"
max-sessions = 5
stereotype = "{\"browserName\": \"MicrosoftEdge\"}"
- Run the commands below in different command lines.
java -jar selenium-server-4.10.0.jar standalone --config config.toml
Docker installation
The following link provides detailed instructions on how to run Selenium 4 using Selenium Docker images: https://github.com/SeleniumHQ/docker-selenium.
Docker Compose is the simplest way to start a Grid.
- Download docker-compose-v3.yml, and check the execution instructions at the top of each file. You can also edit the file to add more nodes by adding replicas. An example is as follows:
services:
  chrome:
    image: selenium/node-chrome:4.10.0
    shm_size: 2gb
    depends_on:
      - selenium-hub
    deploy:
        replicas: 2
    restart: always
    environment:
      - SE_EVENT_BUS_HOST=selenium-hub
      - SE_EVENT_BUS_PUBLISH_PORT=4442
      - SE_EVENT_BUS_SUBSCRIBE_PORT=4443

  firefox:
    image: selenium/node-firefox:4.10.0
    shm_size: 2gb
    depends_on:
      - selenium-hub
    deploy:
        replicas: 2
    restart: always
    environment:
      - SE_EVENT_BUS_HOST=selenium-hub
      - SE_EVENT_BUS_PUBLISH_PORT=4442
      - SE_EVENT_BUS_SUBSCRIBE_PORT=4443

  edge:
    image: selenium/node-edge:4.10.0
    shm_size: 2gb
    depends_on:
      - selenium-hub
    deploy:
        replicas: 2
    restart: always
    environment:
      - SE_EVENT_BUS_HOST=selenium-hub
      - SE_EVENT_BUS_PUBLISH_PORT=4442
      - SE_EVENT_BUS_SUBSCRIBE_PORT=4443

  selenium-hub:
    image: selenium/hub:4.10.0
    container_name: selenium-hub
    ports:
      - "4442:4442"
      - "4443:4443"
      - "4444:4444"
    restart: always
- Start Selenium Grid 4.
docker-compose -f docker-compose-v3.yml up -d
- Stop Selenium Grid 4.
docker-compose -f docker-compose-v3.yml down
Installing Selenium Grid v3
Notes
Below are the reference links for how to set up Selenium Grid. They include detailed parameter setting explanations.
Local installation
-
Download Selenium Grid 3.141.59
-
Download Selenium web drivers and put them under the same folder as the Selenium Jar file.
- Start the Hub
- Create hubconfig.json
{ "port": 4444, "newSessionWaitTimeout": 10000, "servlets" : [], "withoutServlets": [], "custom": {}, "capabilityMatcher": "org.openqa.grid.internal.utils.DefaultCapabilityMatcher", "registry": "org.openqa.grid.internal.DefaultGridRegistry", "throwOnCapabilityNotPresent": true, "cleanUpCycle": 5000, "role": "hub", "debug": false, "browserTimeout": 60, "timeout": 60 } - Run the command
java -jar selenium-server-standalone-3.141.59.jar -role hub -hubConfig hubconfig.json
- Create hubconfig.json
- Start the Node
- Create nodeconfig.json
{ "capabilities": [ { "browserName": "firefox", "maxInstances": 5 }, { "browserName": "chrome", "maxInstances": 5 }, { "browserName": "internet explorer", "platform": "WINDOWS", "maxInstances": 1 } ], "proxy": "org.openqa.grid.selenium.proxy.DefaultRemoteProxy", "maxSession": 5, "port": -1, "register": true, "registerCycle": 5000, "hub": "http://localhost:4444", "nodeStatusCheckTimeout": 5000, "nodePolling": 5000, "role": "node", "unregisterIfStillDownAfter": 60000, "downPollingLimit": 2, "debug": false, "servlets": [], "withoutServlets": [], "custom": {}, "browserTimeout": 60, "timeout": 60 } - Run the command
java -jar selenium-server-standalone-3.141.59.jar -role node -nodeConfig nodeconfig.json
Notes: To see the parameter meanings, you could run these scripts:
java -jar .\selenium-server-standalone-3.141.59.jar -role node -help java -jar .\selenium-server-standalone-3.141.59.jar -role hub -help - Create nodeconfig.json
Docker installation
The following link shows a step-by-step introduction to using the official Selenium Docker images with a basic Selenium Hub and Selenium Node configuration.
Selenium: Getting-Started-with-Hub-and-Nodes
You can follow the script below to install the Selenium Hub and Node on Docker. We recommend you install the debug image version so you can visually see what the browser is doing.
docker pull selenium/hub:3.141.59
docker pull selenium/node-firefox:3.141.59
docker pull selenium/node-chrome:3.141.59

docker network create grid
docker run -d -p 4444:4444 --net grid --name selenium-hub selenium/hub:3.141.59
docker run -d -P --net grid -e HUB_HOST=selenium-hub  -v /dev/shm:/dev/shm selenium/node-chrome:3.141.59
docker run -d -P --net grid -e HUB_HOST=selenium-hub  -v /dev/shm:/dev/shm selenium/node-firefox:3.141.59
You can run the command below multiple times; it will create multiple Chrome/Firefox nodes for the grid remote testing. It can provide you the ability to run Selenium testing in parallel on the Grid. We recommend creating more than 5 nodes for Chrome/Firefox each.
docker run -d -P --net grid -e HUB_HOST=selenium-hub  -v /dev/shm:/dev/shm selenium/node-chrome:3.141.59
docker run -d -P --net grid -e HUB_HOST=selenium-hub  -v /dev/shm:/dev/shm selenium/node-firefox:3.141.59
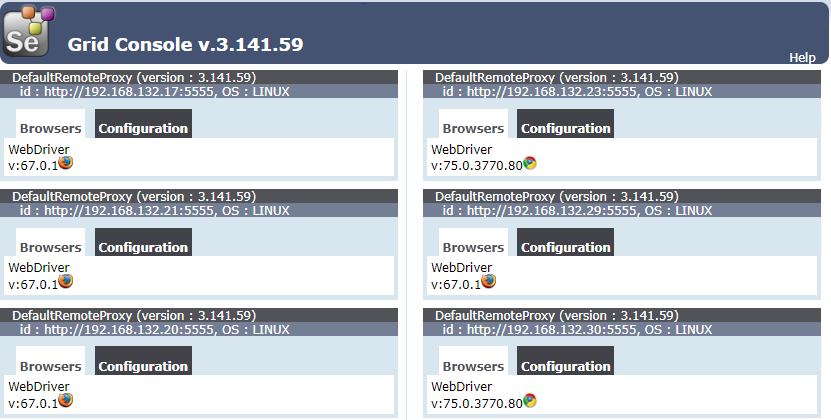
After that, you can open the browser http://dockerhostIP:4444/grid/console to check the Selenium Grid/Node installation status.