Installing IDA Application(v3.x, v2.x)
Repackage IDA WAR
Modify IDA configuration by repackaging IDA WAR, more details please refer to Repacking IDA v2.x Application.
Installing IDA Web Application
The IDA Web Application can be installed on WebSphere Application Server (WAS), Liberty, or Docker. Let’s introduce the way to install IDA on Liberty first.
Installing on Liberty
1. Create a Liberty server
You can create a server from the command line.
- Unzip the Liberty installation package. Open a command line, then navigate to the wlp/bin directory.
Where
is the location you installed Liberty on your operating system.
cd <path_to_liberty>/wlp/bin
- Run the following command to create a server.
./server create SERVER_NAME
The ‘SERVER_NAME’ must use only Unicode alphanumeric (for example, 0-9, a-z, A-Z), underscore (_), dash (-), plus (+), and period (.) characters. The name cannot begin with a dash or period. Your file system, operating system, or compressed file directory might impose more restrictions.
If the server is created successfully, you will receive the message: Server SERVER_NAME created.
2. Configure Liberty
Edit the server.xml from the wlp/usr/servers/SERVER_NAME folder. You could use the below sample server.xml to override your server.xml and update httpPort, httpsPort, and keyStore password, and enable features ssl,websocket.
Here is a sample server.xml (IDA version v2.7.x)
<?xml version="1.0" encoding="UTF-8"?>
<server description="Default server">

    <featureManager>
        <feature>servlet-3.1</feature>
        <feature>ssl-1.0</feature>
        <feature>websocket-1.1</feature>
    </featureManager>

    <!-- To enable https, there should be a keyStore object, you could update the password value, by default is idaAdmin.-->
    <!-- The Liberty will generate key.p12 and Itpa.keys in the ${server.output.dir}/resources/security folder.-->
    <!-- Please be careful before updating the password field,
         You must delete the generated key.p12 and Itpa.keys in the ${server.output.dir}/resources/security folder first!-->
    <keyStore id="defaultKeyStore" password="idaAdmin" />

    <webContainer invokeFlushAfterService="false"/>

    <!-- To access this server from a remote client add a host attribute to the following element, e.g. host="*" -->
    <httpEndpoint id="defaultHttpEndpoint"
                  host="*"
                  httpPort="9080"
                  httpsPort="9443" />

    <!-- Automatically expand WAR files and EAR files -->
    <applicationManager autoExpand="true" startTimeout="360s" stopTimeout="120s"/>
        <application type="war" id="ida" name="ida" location="${server.config.dir}/apps/ida-web.war">
                <classloader delegation="parentLast" />
    </application>

</server>
IDA Supports JNDI datasource from v3.0.0. You can configure a data source and JDBC provider for database connectivity.
1. In the server.xml file, define a shared library that points to the location of your JDBC driver JAR or compressed files. For example:
  <library id="DatabaseLib">
      <fileset dir="C:/DB2/java" includes="*.jar"/>
  </library>
2. Configure attributes for the data source, such as JDBC vendor properties and connection pooling properties. For example:
  <dataSource jndiName="jdbc/ida" statementCacheSize="60" id="DefaultDataSource"
          isolationLevel="TRANSACTION_READ_COMMITTED" type="javax.sql.DataSource" transactional="true">
    <jdbcDriver libraryRef="DatabaseLib"/>
    <properties databaseName="idaweb"
                serverName="localhost" portNumber="3306"
                user="root" password="mysqladmin"/>
  </dataSource>
Here is a sample server.xml (IDA version v3.x)
Please update the fields host, httpPort, httpsPort, library, and dataSource. More information about configuring relational database connectivity in Liberty, please refer to Data Source Configuration.
For example:
<?xml version="1.0" encoding="UTF-8"?>
<server description="new server">

    <!-- Enable features -->
    <featureManager>
        <feature>servlet-3.1</feature>
        <feature>ssl-1.0</feature>
        <feature>websocket-1.1</feature>
        <feature>jdbc-4.2</feature>
        <feature>jndi-1.0</feature>
    </featureManager>

    <!-- This template enables security. To get the full use of all the capabilities, a keystore and user registry are required. -->

    <!-- For the keystore, default keys are generated and stored in a keystore. To provide the keystore password, generate an
         encoded password using bin/securityUtility encode and add it below in the password attribute of the keyStore element.
         Then uncomment the keyStore element. -->

    <keyStore id="defaultKeyStore" password="idaAdmin" />

    <!-- There's an issue using jdk 8 with TLSv1.3, enable TLSv1.2 as below to work around the issue. -->
    <ssl id="defaultSSLConfig" keyStoreRef="defaultKeyStore" trustDefaultCerts="true" sslProtocol="TLSv1.2"/>

    <webContainer invokeFlushAfterService="false"/>

    <!--For a user registry configuration, configure your user registry. For example, configure a basic user registry using the
        basicRegistry element. Specify your own user name below in the name attribute of the user element. For the password,
        generate an encoded password using bin/securityUtility encode and add it in the password attribute of the user element.
        Then uncomment the user element. -->
    <basicRegistry id="basic" realm="BasicRealm">
        <!-- <user name="yourUserName" password="" />  -->
    </basicRegistry>

    <!-- To access this server from a remote client add a host attribute to the following element, e.g. host="*" -->
    <httpEndpoint id="defaultHttpEndpoint"
				  host="*" httpPort="9080" httpsPort="9443" />

    <!-- Automatically expand WAR files and EAR files -->
    <applicationManager autoExpand="true" startTimeout="360s" stopTimeout="120s"/>
	  <application type="war" id="ida" name="ida" location="${server.config.dir}/apps/ida-web.war">
    </application>

	<!-- <keyStore id="defaultKeyStore" password="idaAdmin" /> -->

  <!-- Shared libraries
    https://www.ibm.com/support/knowledgecenter/SSEQTP_liberty/com.ibm.websphere.wlp.doc/ae/cwlp_sharedlibrary.html
    -->
  <!-- JNDI data source configuration -->


  <!-- Define a shared library pointing to the location of the JDBC driver JAR or compressed files. For example:  -->

  <!-- MySQL Example-->
  <library id="MYSQLLib">
      <fileset dir="${shared.config.dir}/lib/global" includes="mysql-connector-java-8.0.18.jar"/>
  </library>

  <!-- Configure attributes for the data source, such as JDBC vendor properties and connection pooling properties. For example:  -->
  <dataSource jndiName="jdbc/ida" statementCacheSize="60" id="DefaultDataSource"
          isolationLevel="TRANSACTION_READ_COMMITTED" type="javax.sql.DataSource" transactional="true">
    <jdbcDriver libraryRef="MYSQLLib"/>
    <properties databaseName="<DATABASE_NAME>"
                serverName="<SERVER_NAME>" portNumber="<SERVER_PORT>"
                user="<USER_NAME>" password="<PASSWORD>"/>
  </dataSource>
  <!-- MySQL Example End-->

  <!-- DB2 Example-->
  <library id="DB2Lib">
      <fileset dir="${shared.config.dir}/lib/global" includes="db2jcc4-11.1.jar"/>
  </library>
  <dataSource jndiName="jdbc/ida" statementCacheSize="60" id="DB2DataSource"
          isolationLevel="TRANSACTION_READ_COMMITTED" type="javax.sql.DataSource" transactional="true">
    <jdbcDriver libraryRef="DB2Lib"/>
    <properties.db2.jcc databaseName="${env.DATABASE_NAME}" currentSchema="${env.DATABASE_IDA_SCHEMA}"
                serverName="${env.DATABASE_SERVER_NAME}" portNumber="${env.DATABASE_PORT_NUMBER}"
                user="${env.DATABASE_USER}" password="${env.DATABASE_PASSWORD}"/>
  </dataSource>
  <!-- DB2 Example End-->

  <!-- Oracle Example-->
  <library id="ORACLELib">
      <fileset dir="${shared.resource.dir}" includes="ojdbc8-12.2.0.1.jar"/>
  </library>
  <dataSource jndiName="jdbc/ida" statementCacheSize="60" id="OracleDataSource" isolationLevel="TRANSACTION_READ_COMMITTED" type="javax.sql.DataSource" transactional="true">
    <jdbcDriver libraryRef="ORACLELib"/>
    <properties.oracle url="${env.DATABASE_URL}"
          user="${env.DATABASE_USER}" password="${env.DATABASE_PASSWORD}"/>
  </dataSource>
  <!-- Oracle Example END-->

</server>
We found an issue using jdk 8 with TLSv1.3, which can cause very high CPU usage of IDA. To fix the issue, use TLSv1.2 by adding the below configuration to server.xml.
<ssl id="defaultSSLConfig" keyStoreRef="defaultKeyStore" trustDefaultCerts="true" sslProtocol="TLSv1.2"/>
Liberty supports Advanced Encryption Standard (AES) encryption for passwords that are stored in the server.xml file. In the Liberty installation bin folder, you can use the securityUtility command to encrypt your password.
./securityUtility encode password
More information about encryption, please refer to SecurityUtility Command.
3. Copy the ida-web.war to the /usr/servers/SERVER_NAME/apps directory
4. Start the Liberty server
In the Liberty installation bin folder, you can use the below command to start the server.
./server start SERVER_NAME
In addition, you could customize the Liberty environment with jvm.options as an optional step Customize JVM options by using jvm.options files.
- Create a text file named jvm.options. Copy it to the path_to_liberty/wlp/usr/servers/yourservername directory.
Update heap size setting
Add the below to jvm.options, e.g., set the maximum heap size to 1024m.
- -Xmx1024m
If the heap size is not big enough, IDA checkstyle may crash with an out-of-memory exception thrown. Increasing the heap size and restarting the server can fix this issue.
Support http proxy
We might need a proxy server to visit the application. The proxy settings can be passed to the runtime via the JAVA_OPTS environment variable.
- Add the following lines to jvm.options based on your actual proxy setting. You can change https to http as well.
-Dhttps.proxyHost=host
-Dhttps.proxyPort=port
-Dhttps=proxyUser=user
-Dhttps.proxyPassword=your password
with a remote testing automation framework based on Selenium Grid.
Notes
Below is the reference link for how to set up Selenium Grid. It includes detailed parameter setting explanations.
Installing on WAS V9
Check the WAS version
IDA uses the Spring Boot WebSocket feature, which is not supported by WebSphere v8.5.5. It is recommended to install IDA on WebSphere v9.0.5.4+.
- Log in to the WAS console, in the Welcome part, you can see the version of WAS.
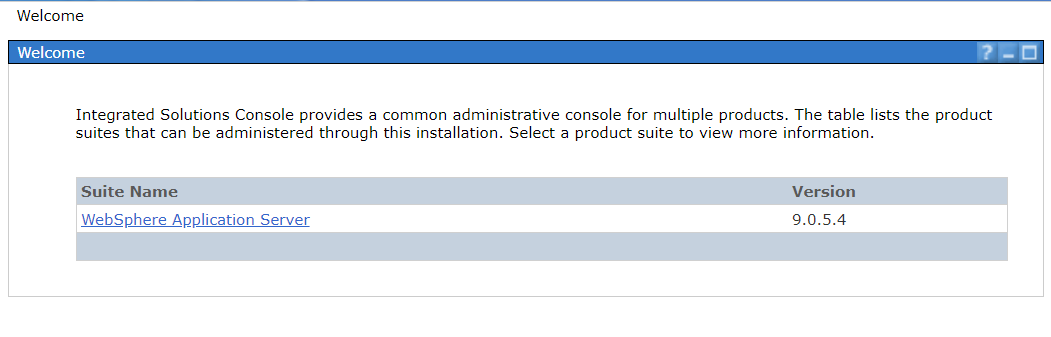
- If the WAS version is below 9.0.5.4, you should install the Fix Packs 9.0.5.4+, here is the minimum fix pack version:
-
Follow the instructions on this page to install the fix pack.
- When finished with the fix packs installation, the version will change to 9.0.5.4.
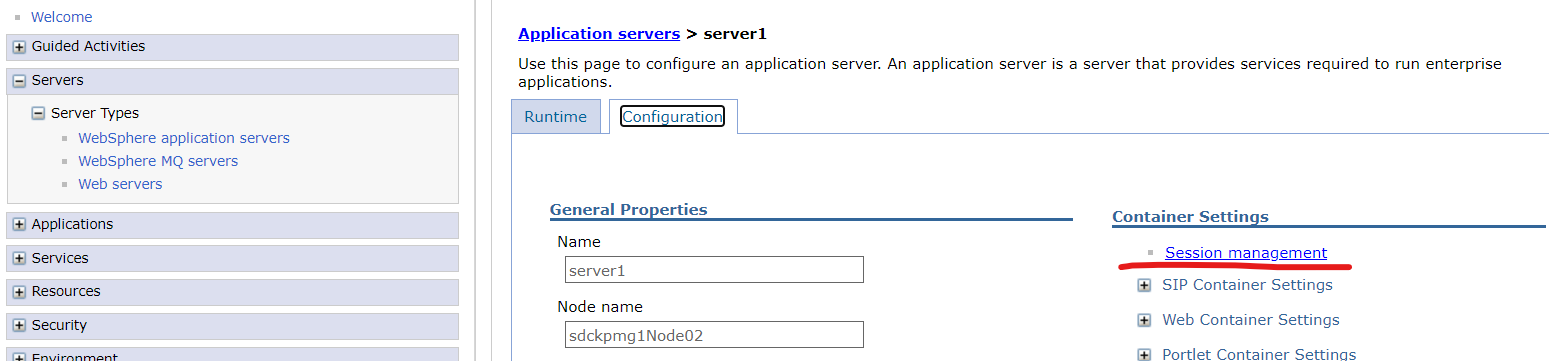
Update Session Management on WAS Console
-
Log in to the WebSphere Integrated Solutions Console as an administrator (URL: https://host:port/ibm/console/login.do?action=secure).
-
In the left navigation bar, click Servers > Server Types > WebSphere application servers > server_name > Session management
Deploy a New Application on WAS
After finishing the installation of the fix packs, the next step is to deploy the IDA war to WAS.
-
Log in to the WebSphere Integrated Solutions Console as an administrator (URL: https://host:port/ibm/console/login.do?action=secure).
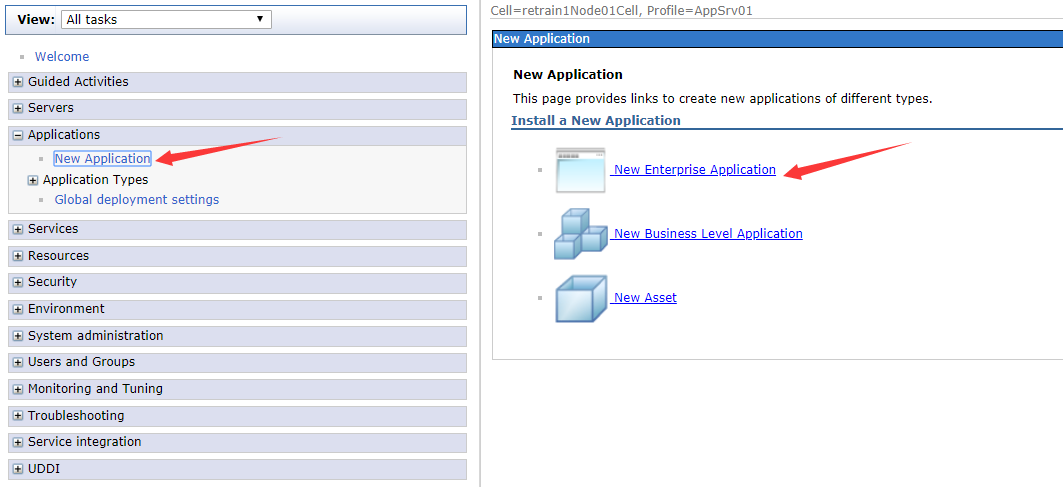
-
In the left navigation bar, click New Application > New Enterprise Application.
-
In the Path to the new application section, check the Local file system and select the ida-web.war in your local file system. When the war package is uploaded, click the Next button.

-
Choose the Fast Path option. Click the Next button.
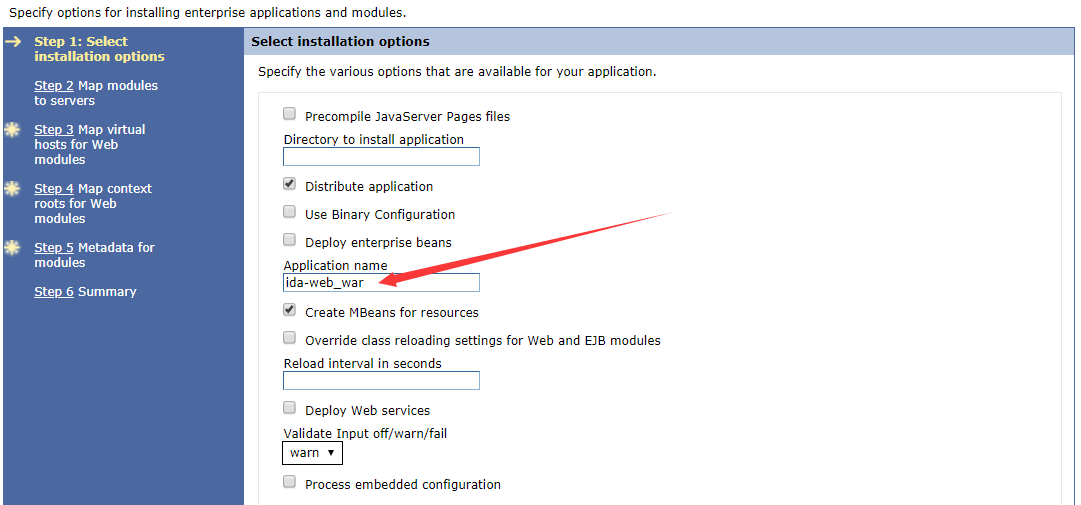
-
Now the current page is used to specify options for installing the enterprise application and modules. In step 1, you can change the application name, click the Next button after changing the application name.
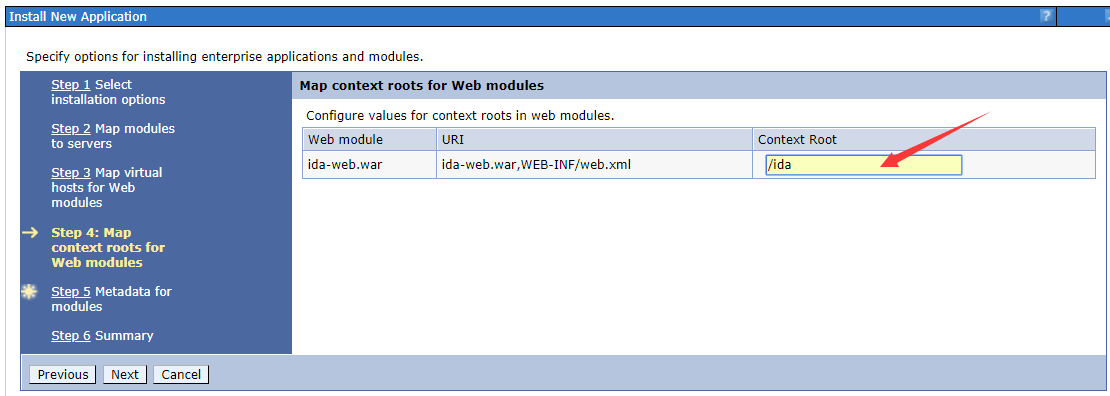
-
There is nothing to change in step 2 and step 3. Step 4 is used to configure values for the context root in web modules, we should set the Context Root as /ida as shown below.
-
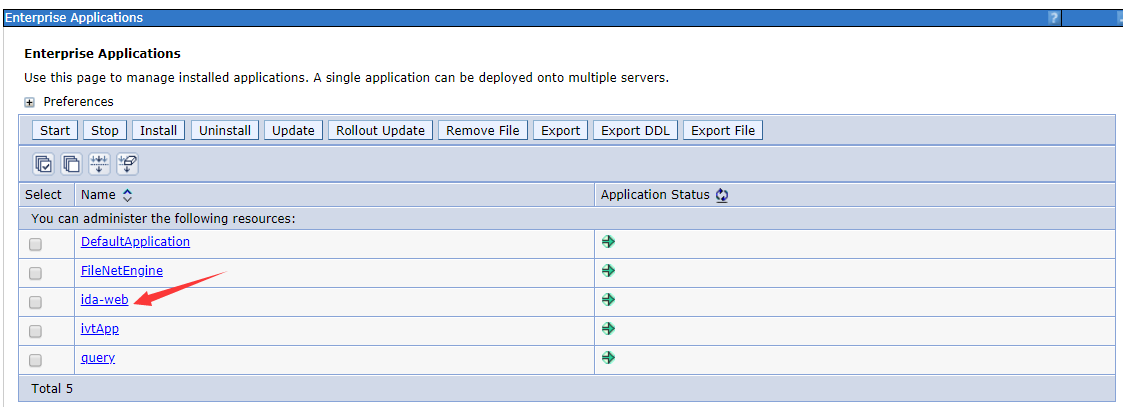
There is nothing to change in step 5. In step 6, click the finish button and wait for the server to complete the installation of the IDA web application. When finished, click WebSphere enterprise application in the left navigation bar, you can see that the IDA web application is in the Enterprise Applications table.
Configure the Class Loader Order
-
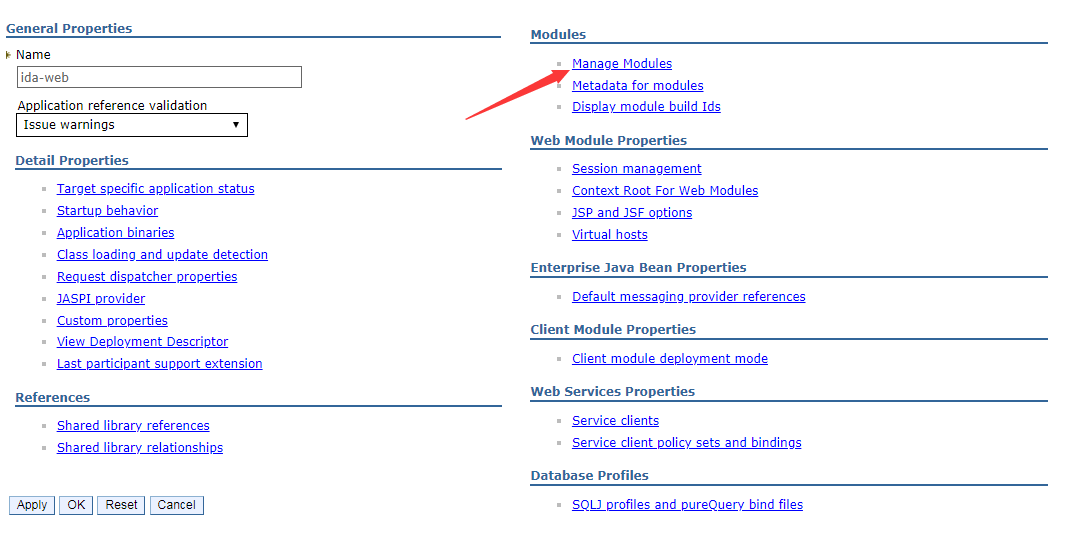
Click the link of ida-web in the table and go to the app configuration page.
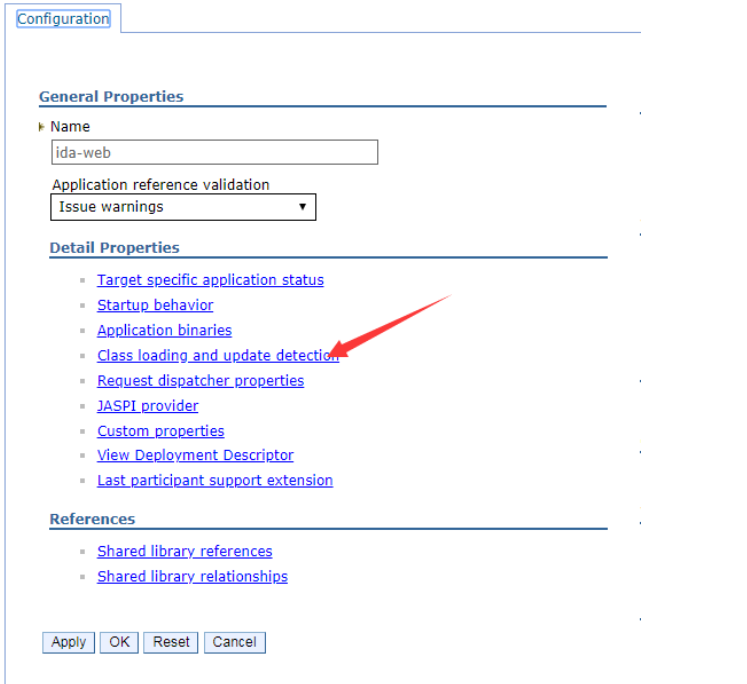
-
Click the Class loading and update detection link as shown below.
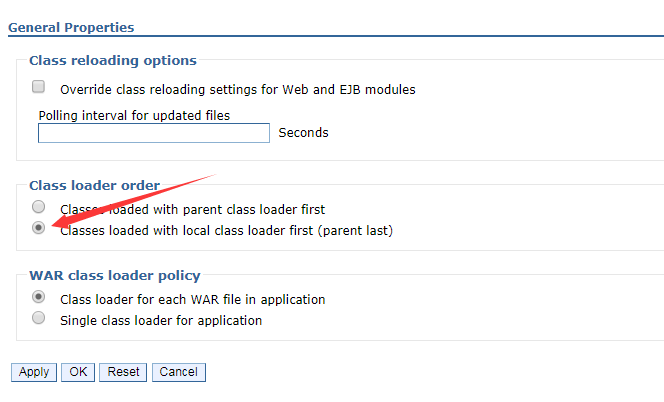
-
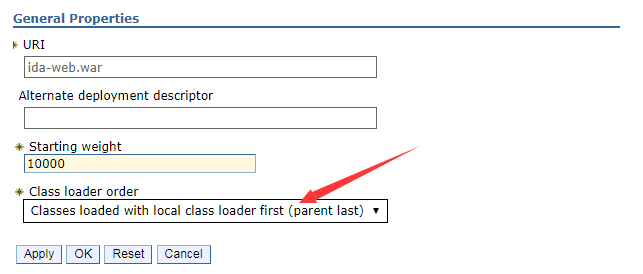
Change the class loader order to Classes loaded with local class loader first (parent last).
-
Then go back to the configuration page, and then click the Manage Modules link.
-
Click the link of ida-web.war, in the configuration page, change the class loader order to Classes loaded with local class loader first (parent last).
-
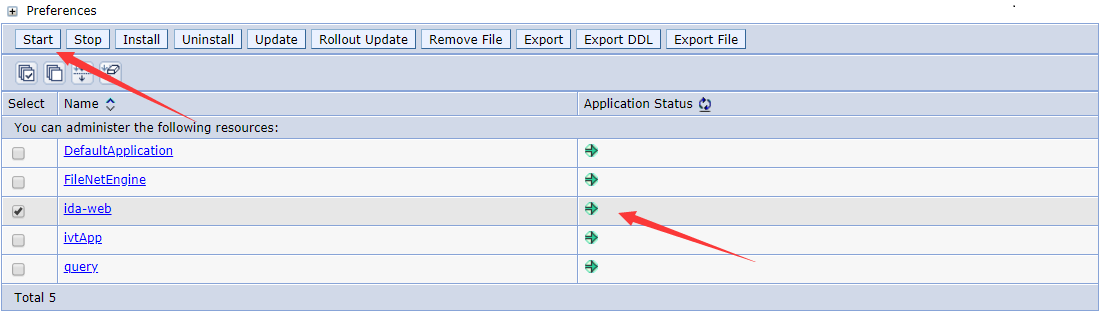
Save the changes and start the IDA web application. When the status of the IDA web application changes to started, you can visit the URL like http://serverip:port/ida to access the IDA web application.
Installing on WAS v8.5.5.16 Liberty Profile
Install WebSphere Liberty and configure your applications
1. Download wlp-webProfile7-java8-linux-x86_64-19.0.0.2.zip from here:
https://ak-delivery04-mul.dhe.ibm.com/sar/CMA/WSA/084l4/0/wlp-webProfile7-java8-linux-x86_64-19.0.0.2.zip
2. Unzip it and move the wlp directory to /opt/ibm/baw/
unzip wlp-webProfile7-java8-linux-x86_64-19.0.0.2.zip
mv ./wlp /opt/ibm/baw/
3. Create a new Liberty server, for example: was-liberty
cd /opt/ibm/baw/wlp/bin
./server create was-liberty
4. Put the ida-web.war in the /opt/ibm/baw/wlp/usr/servers/was-liberty/apps
5. Edit the server.xml.
Please update the fields: host, httpPort, and httpsPort, for example:
For example (IDA v2.7.x):
<?xml version="1.0" encoding="UTF-8"?>
<server description="Default server">

    <!-- Enable features -->
    <featureManager>
        <feature>servlet-3.1</feature>
        <feature>ssl-1.0</feature>
        <feature>websocket-1.1</feature>
    </featureManager>

    <!-- This template enables security. To get the full use of all the capabilities, a keystore and user registry are required. -->

    <!-- For the keystore, default keys are generated and stored in a keystore. To provide the keystore password, generate an
         encoded password using bin/securityUtility encode and add it below in the password attribute of the keyStore element.
         Then uncomment the keyStore element. -->
    <!--
    <keyStore password=""/>
    -->
    <webContainer invokeFlushAfterService="false"/>

    <!--For a user registry configuration, configure your user registry. For example, configure a basic user registry using the
        basicRegistry element. Specify your own user name below in the name attribute of the user element. For the password,
        generate an encoded password using bin/securityUtility encode and add it in the password attribute of the user element.
        Then uncomment the user element. -->
    <basicRegistry id="basic" realm="BasicRealm">
        <!-- <user name="yourUserName" password="" />  -->
    </basicRegistry>

    <!-- To access this server from a remote client add a host attribute to the following element, e.g. host="*" -->
    <httpEndpoint id="defaultHttpEndpoint"
                                  host="<YOUR_HOST_IP>"
                  httpPort="9680"
                  httpsPort="9643" />


    <!-- Automatically expand WAR files and EAR files -->
    <applicationManager autoExpand="true" startTimeout="360s" stopTimeout="120s"/>
        <application type="war" id="ida" name="ida" location="${server.config.dir}/apps/ida-web.war">
                <classloader delegation="parentLast" />
    </application>

        <keyStore id="defaultKeyStore" password="idaAdmin" />

</server>
Please update the fields host, httpPort, httpsPort, library, and dataSource.
For example (IDA v3.x):
<?xml version="1.0" encoding="UTF-8"?>
<server description="new server">

    <!-- Enable features -->
    <featureManager>
        <feature>servlet-3.1</feature>
        <feature>ssl-1.0</feature>
        <feature>websocket-1.1</feature>
        <feature>jdbc-4.2</feature>
        <feature>jndi-1.0</feature>
    </featureManager>

    <!-- This template enables security. To get the full use of all the capabilities, a keystore and user registry are required. -->

    <!-- For the keystore, default keys are generated and stored in a keystore. To provide the keystore password, generate an
         encoded password using bin/securityUtility encode and add it below in the password attribute of the keyStore element.
         Then uncomment the keyStore element. -->

    <keyStore id="defaultKeyStore" password="idaAdmin" />

    <webContainer invokeFlushAfterService="false"/>

    <!--For a user registry configuration, configure your user registry. For example, configure a basic user registry using the
        basicRegistry element. Specify your own user name below in the name attribute of the user element. For the password,
        generate an encoded password using bin/securityUtility encode and add it in the password attribute of the user element.
        Then uncomment the user element. -->
    <basicRegistry id="basic" realm="BasicRealm">
        <!-- <user name="yourUserName" password="" />  -->
    </basicRegistry>

    <!-- To access this server from a remote client add a host attribute to the following element, e.g. host="*" -->
    <httpEndpoint id="defaultHttpEndpoint"
				  host="*" httpPort="9080" httpsPort="9443" />

    <!-- Automatically expand WAR files and EAR files -->
    <applicationManager autoExpand="true" startTimeout="360s" stopTimeout="120s"/>
	  <application type="war" id="ida" name="ida" location="${server.config.dir}/apps/ida-web.war">
    </application>

	<!-- <keyStore id="defaultKeyStore" password="idaAdmin" /> -->

  <!-- Shared libraries
    https://www.ibm.com/support/knowledgecenter/SSEQTP_liberty/com.ibm.websphere.wlp.doc/ae/cwlp_sharedlibrary.html
    -->
  <!-- JNDI data source configuration -->


  <!-- Define a shared library pointing to the location of the JDBC driver JAR or compressed files. For example:  -->

  <!-- MySQL Example-->
  <library id="MYSQLLib">
      <fileset dir="${shared.config.dir}/lib/global" includes="mysql-connector-java-8.0.18.jar"/>
  </library>

  <!-- Configure attributes for the data source, such as JDBC vendor properties and connection pooling properties. For example:  -->
  <dataSource jndiName="jdbc/ida" statementCacheSize="60" id="DefaultDataSource"
          isolationLevel="TRANSACTION_READ_COMMITTED" type="javax.sql.DataSource" transactional="true">
    <jdbcDriver libraryRef="MYSQLLib"/>
    <properties databaseName="<DATABASE_NAME>"
                serverName="<SERVER_NAME>" portNumber="<SERVER_PORT>"
                user="<USER_NAME>" password="<PASSWORD>"/>
  </dataSource>
  <!-- MySQL Example End-->

  <!-- DB2 Example-->
  <library id="DB2Lib">
      <fileset dir="${shared.config.dir}/lib/global" includes="db2jcc4-11.1.jar"/>
  </library>
  <dataSource jndiName="jdbc/ida" statementCacheSize="60" id="DB2DataSource"
          isolationLevel="TRANSACTION_READ_COMMITTED" type="javax.sql.DataSource" transactional="true">
    <jdbcDriver libraryRef="DB2Lib"/>
    <properties.db2.jcc databaseName="${env.DATABASE_NAME}"
                serverName="${env.DATABASE_SERVER_NAME}" portNumber="${env.DATABASE_PORT_NUMBER}"
                user="${env.DATABASE_USER}" password="${env.DATABASE_PASSWORD}"/>
  </dataSource>
  <!-- DB2 Example End-->

  <!-- Oracle Example-->
  <library id="ORACLELib">
      <fileset dir="${shared.resource.dir}" includes="ojdbc8-12.2.0.1.jar"/>
  </library>
  <dataSource jndiName="jdbc/ida" statementCacheSize="60" id="OracleDataSource" isolationLevel="TRANSACTION_READ_COMMITTED" type="javax.sql.DataSource" transactional="true">
    <jdbcDriver libraryRef="ORACLELib"/>
    <properties.oracle url="${env.DATABASE_URL}"
          user="${env.DATABASE_USER}" password="${env.DATABASE_PASSWORD}"/>
  </dataSource>
  <!-- Oracle Example END-->

</server>
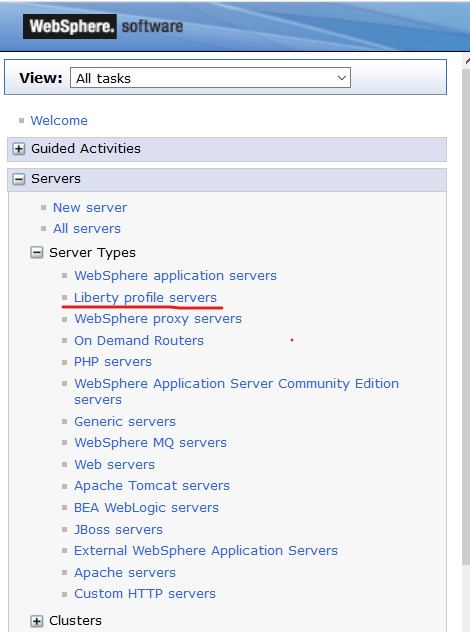
Create a Liberty Profile server from the WebSphere console page
-
Select “Server Types -> Liberty Profile servers” from the left menu.
-
In step 2, input the server name.
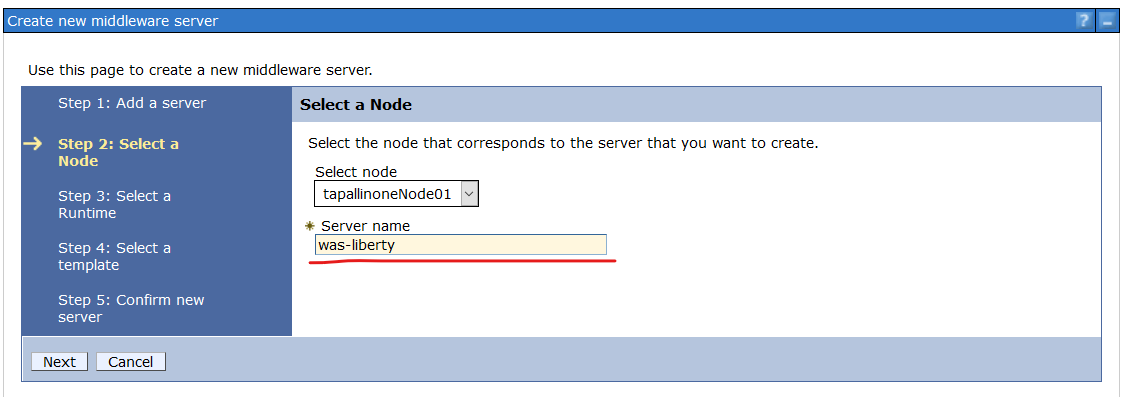
-
There is nothing to change in steps 3, 4, and 5, then click the finish button.
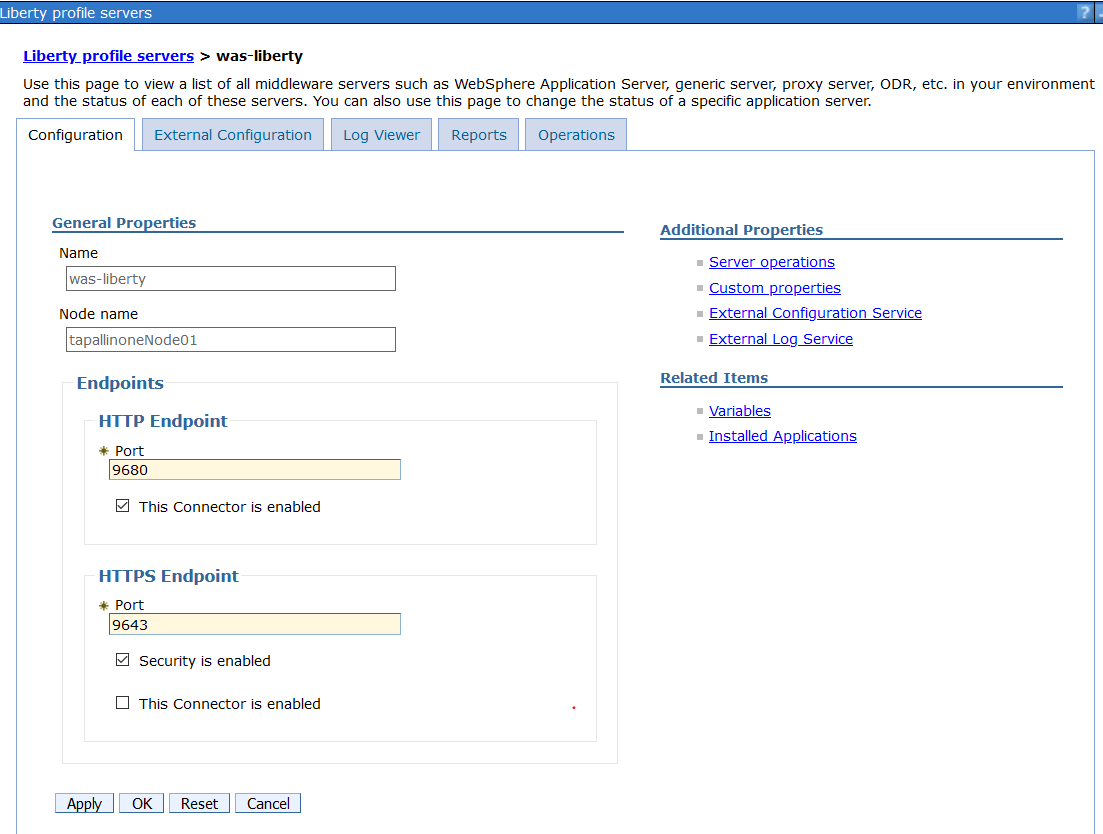
-
Click the “was-liberty” in the table, we need to make some configurations.
-
In the Configuration tab, input your preferred HTTP and HTTPS ports. Please make sure they are the same as your server.xml.
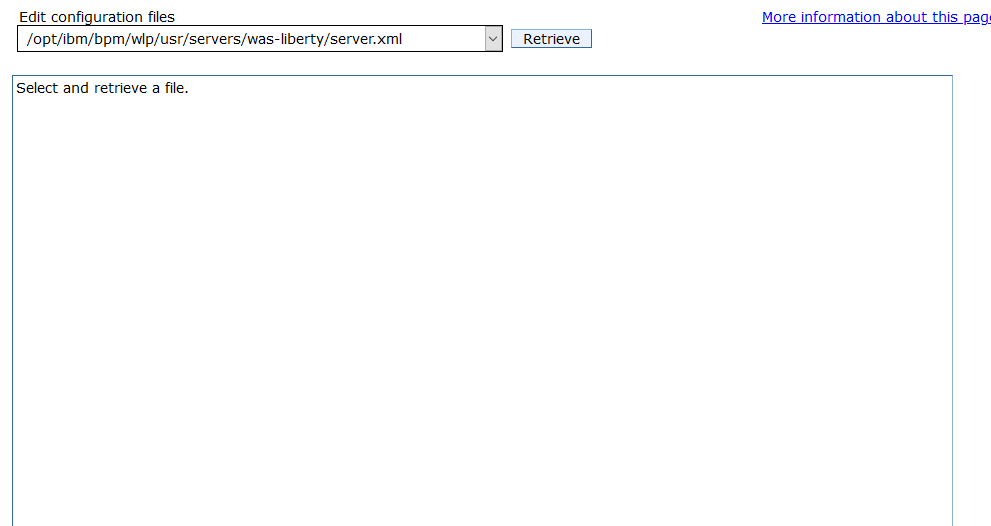
-
In the External Configuration tab, select your configuration file from the dropdown. Click the retrieve button to view the file contents. Click the apply button if you make any changes.
-
Back to the Liberty Profile servers page and select was-liberty, click the Start button to run the server.

8. You could visit the URL like http://serverip:port/ida to access the IDA web application.