High Availability for IDA Application on Liberty and HAProxy
Recommended Topology
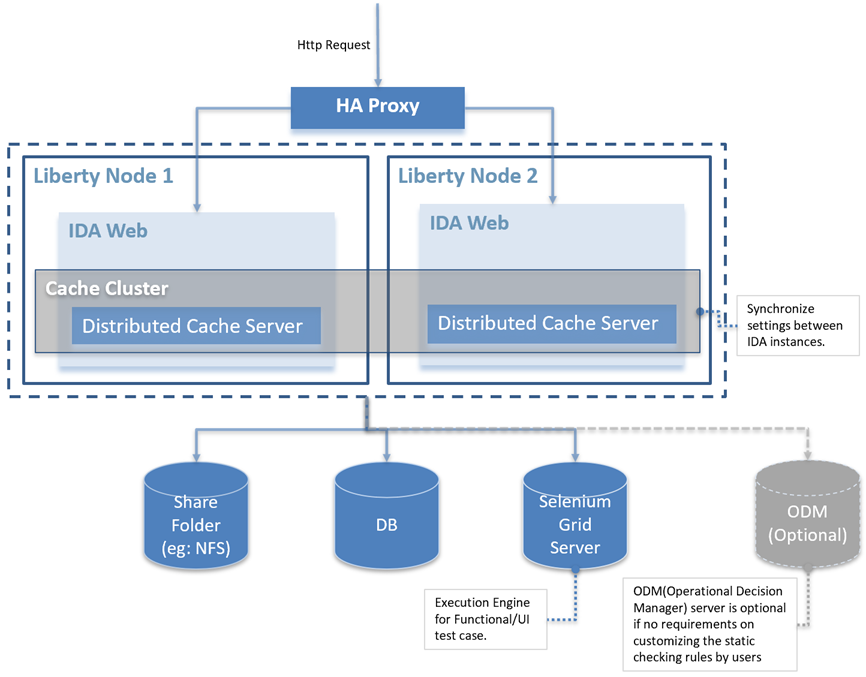
There are two parts for IDA application high availability that we need to install and configure, including:
- High Availability Configuring for IDA Application on Liberty
- HAProxy Setup
High Availability Configuring for IDA Application on Liberty
Prerequisite: Already set up a shared folder on both node servers. For example, /share-folder/ida-data
Step 1: Create a Liberty Server
You can create a server from the command line.
-
Unzip the Liberty installation package. Open a command line, then navigate to the wlp/bin directory. Where
is the location you installed Liberty on your operating system. -
Run the following command to create a server.
<path_to_liberty>/wlp/bin/server create <SERVER_NAME>
The ‘SERVER_NAME’ must use only Unicode alphanumeric (for example, 0-9, a-z, A-Z), underscore (_), dash (-), plus (+), and period (.) characters. The name cannot begin with a dash or period. Your file system, operating system, or compressed file directory might impose more restrictions.
If the server is created successfully, you will receive the message: Server SERVER_NAME created.
Step 2: Configure server.xml
Edit server.xml from the <path_to_liberty>/wlp/usr/servers/<SERVER_NAME> folder. You could use the below sample server.xml to override your server.xml and update httpPort, httpsPort and keyStore and enable features ssl,websocket.
IDA supports JNDI datasource from v3.0.0. You can configure a data source and JDBC provider for database connectivity.
1. In the server.xml file, define a shared library that points to the location of your JDBC driver JAR or compressed files. For example:
  <library id="DatabaseLib">
      <fileset dir="C:/DB2/java" includes="*.jar"/>
  </library>
2. Configure attributes for the data source, such as JDBC vendor properties and connection pooling properties. For example:
  <dataSource jndiName="jdbc/ida" statementCacheSize="60" id="DefaultDataSource"
          isolationLevel="TRANSACTION_READ_COMMITTED" type="javax.sql.DataSource" transactional="true">
    <jdbcDriver libraryRef="DatabaseLib"/>
    <properties databaseName="idaweb"
                serverName="localhost" portNumber="3306"
                user="root" password="mysqladmin"/>
  </dataSource>
3. Customize the SSL server key for Liberty
- Create an SSL certificate using the
keytoolcommandkeytool -genkeypair -alias MyLibertyKey -keyalg RSA -keysize 2048 -sigalg SHA256withRSA -dname "cn=<hostname>, o=<organization>, ou=<organizational unit>, c=<country>" -validity 365 -storetype PKCS12 -keypass idaAdmin -storepass idaAdmin -keystore <path_to_liberty>/wlp/usr/servers/<SERVER_NAME>/resources/security/libertykeystore.p12 -ext san=dns:<hostname> - Configure the keystore in server.xml
<keyStore id="defaultKeyStore" password="idaAdmin" location="${server.config.dir}/resources/security/libertykeystore.p12" />
Note: Copy the generated SSL certificate to all IDA Liberty servers and configure the keystore.
4. Support for X-Forwarded-* and Forwarded headers
Add the following configuration in server.xml, which supports X-Forwarded-* and Forwarded headers in Liberty for better integration with front-end HTTP load balancers and web servers.
  <httpEndpoint id="defaultHttpEndpoint"
                        host="*" httpPort="-1"
                        httpsPort="9443">
      <remoteIp useRemoteIpInAccessLog="true"/>
  </httpEndpoint>
Here is a sample server.xml
Please update the fields host, httpPort, httpsPort, library, and dataSource. For more information about configuring relational database connectivity in Liberty, please refer to Data Source Configuration.
For example:
<?xml version="1.0" encoding="UTF-8"?>
<server description="new server">

    <!-- Enable features -->
    <featureManager>
        <feature>servlet-3.1</feature>
        <feature>transportSecurity-1.0</feature>
        <feature>websocket-1.1</feature>
        <feature>jdbc-4.2</feature>
        <feature>jndi-1.0</feature>
    </featureManager>

    <!-- This template enables security. To get the full use of all the capabilities, a keystore and user registry are required. -->

    <!-- For the keystore, default keys are generated and stored in a keystore. To provide the keystore password, generate an
         encoded password using bin/securityUtility encode and add it below in the password attribute of the keyStore element.
         Then uncomment the keyStore element. -->

    <keyStore id="defaultKeyStore" password="idaAdmin" location="${server.config.dir}/resources/security/libertykeystore.p12" />

    <!-- There's an issue using JDK 8 with TLSv1.3, enable TLSv1.2 as below to work around the issue. -->
    <ssl id="defaultSSLConfig" keyStoreRef="defaultKeyStore" trustDefaultCerts="true" sslProtocol="TLSv1.2"/>

    <webContainer invokeFlushAfterService="false"/>

    <!--For a user registry configuration, configure your user registry. For example, configure a basic user registry using the
        basicRegistry element. Specify your own user name below in the name attribute of the user element. For the password,
        generate an encoded password using bin/securityUtility encode and add it in the password attribute of the user element.
        Then uncomment the user element. -->
    <basicRegistry id="basic" realm="BasicRealm">
        <!-- <user name="yourUserName" password="" />  -->
    </basicRegistry>

    <!-- To access this server from a remote client add a host attribute to the following element, e.g. host="*" -->
    <httpEndpoint id="defaultHttpEndpoint"
                        host="*" httpPort="-1"
                        httpsPort="9443">
      <remoteIp useRemoteIpInAccessLog="true"/>
    </httpEndpoint>
    <!-- Automatically expand WAR files and EAR files -->
    <applicationManager autoExpand="true" startTimeout="360s" stopTimeout="120s"/>
	  <application type="war" id="ida" name="ida" location="${server.config.dir}/apps/ida-web.war">
    </application>

	<!-- <keyStore id="defaultKeyStore" password="idaAdmin" /> -->

  <!-- Shared libraries
    https://www.ibm.com/support/knowledgecenter/SSEQTP_liberty/com.ibm.websphere.wlp.doc/ae/cwlp_sharedlibrary.html
    -->
  <!-- JNDI data source configuration -->


  <!-- Define a shared library pointing to the location of the JDBC driver JAR or compressed files. For example:  -->

  <!-- MySQL Example-->
  <library id="MYSQLLib">
      <fileset dir="${shared.config.dir}/lib/global" includes="mysql-connector-java-8.0.18.jar"/>
  </library>

  <!-- Configure attributes for the data source, such as JDBC vendor properties and connection pooling properties. For example:  -->
  <dataSource jndiName="jdbc/ida" statementCacheSize="60" id="DefaultDataSource"
          isolationLevel="TRANSACTION_READ_COMMITTED" type="javax.sql.DataSource" transactional="true">
    <jdbcDriver libraryRef="MYSQLLib"/>
    <properties databaseName="<DATABASE_NAME>"
                serverName="<SERVER_NAME>" portNumber="<SERVER_PORT>"
                user="<USER_NAME>" password="<PASSWORD>"/>
  </dataSource>
  <!-- MySQL Example End-->

  <!-- DB2 Example-->
  <library id="DB2Lib">
      <fileset dir="${shared.config.dir}/lib/global" includes="db2jcc4-11.1.jar"/>
  </library>
  <dataSource jndiName="jdbc/ida" statementCacheSize="60" id="DB2DataSource"
          isolationLevel="TRANSACTION_READ_COMMITTED" type="javax.sql.DataSource" transactional="true">
    <jdbcDriver libraryRef="DB2Lib"/>
    <properties.db2.jcc databaseName="${env.DATABASE_NAME}" currentSchema="${env.DATABASE_IDA_SCHEMA}"
                serverName="${env.DATABASE_SERVER_NAME}" portNumber="${env.DATABASE_PORT_NUMBER}"
                user="${env.DATABASE_USER}" password="${env.DATABASE_PASSWORD}"/>
  </dataSource>
  <!-- DB2 Example End-->
</server>
password="${env.DATABASE_PASSWORD}"/>
</dataSource>
<!-- DB2 Example End-->

<!-- Oracle Example-->
<library id="ORACLELib">
    <fileset dir="${shared.resource.dir}" includes="ojdbc8-12.2.0.1.jar"/>
</library>
<dataSource jndiName="jdbc/ida" statementCacheSize="60" id="OracleDataSource" isolationLevel="TRANSACTION_READ_COMMITTED" type="javax.sql.DataSource" transactional="true">
  <jdbcDriver libraryRef="ORACLELib"/>
  <properties.oracle url="${env.DATABASE_URL}"
        user="${env.DATABASE_USER}" password="${env.DATABASE_PASSWORD}"/>
</dataSource>
<!-- Oracle Example END-->

</server>
We found an issue using JDK 8 with TLSv1.3, which can cause very high CPU usage of IDA. To fix the issue, use TLSv1.2 by adding the following configuration to server.xml.
<ssl id="defaultSSLConfig" keyStoreRef="defaultKeyStore" trustDefaultCerts="true" sslProtocol="TLSv1.2"/>
Liberty supports Advanced Encryption Standard (AES) encryption for passwords that are stored in the server.xml file. In the Liberty installation bin folder, you can use the securityUtility command to encrypt your password.
./securityUtility encode password
More information about encryption, please refer to SecurityUtility Command.
Step 3. Configure jvm.options
Create jvm.options from <path_to_liberty>/wlp/usr/servers/<SERVER_NAME>.
Set the maximum heap size to 8192m. If the heap size is not big enough, IDA checkstyle may crash with an out-of-memory exception thrown. Increase the heap size and restart the server to fix this issue.
-Xms512m
-Xmx8192m
You might also need to set a proxy server. Then, add the following lines to jvm.options based on your actual proxy settings.
-Dhttps.proxyHost=host
-Dhttps.proxyPort=port
-Dhttps.proxyUser=user
-Dhttps.proxyPassword=your password
Step 4. Configure server.env
Create server.env from <path_to_liberty>/wlp/usr/servers/<SERVER_NAME>.
Configure the IDA data folder to the shared folder.
ENGINE_CONFIG_DATA_DIR=/share-folder/ida-data
Enable HA configuration.
HAZELCAST_NETWORK_JOIN_TCP_IP_ENABLED=true
HAZELCAST_NETWORK_JOIN_TCP_IP_MEMBER=<your first liberty server IP>,<your second liberty server IP>
ORG_QUARTZ_JOBSTORE_DATASOURCE_ENABLED=true
Additional environment variable for PostgreSQL DB only in HA mode.
ORG_QUARTZ_JOBSTORE_DRIVERDELEGATECLASS=org.quartz.impl.jdbcjobstore.PostgreSQLDelegate
Step 5. Copy the ida-web.war to the apps directory
Copy the ida-web.war to <path_to_liberty>/wlp/usr/servers/<SERVER_NAME>/apps directory.
Step 6. Start the liberty server
<path_to_liberty>/wlp/bin/server start SERVER_NAME
HAProxy setup
Step 1. Install HAProxy in Linux
# Ubuntu
sudo add-apt-repository ppa:vbernat/haproxy-2.7 -y
sudo apt update
sudo apt install haproxy=2.7.\* -y

# Redhat
yum install -y haproxy
Step 2. Start/Stop HAProxy command
systemctl start haproxy
systemctl stop haproxy
systemctl restart haproxy
Step 3. Create haproxy.cfg
Add the config file to /etc/haproxy/haproxy.cfg, and change the node IP and HTTPS port to your IDA nodes.
global
    log         127.0.0.1 local2
    chroot      /var/lib/haproxy
    pidfile     /var/run/haproxy.pid
    maxconn     5000
    user        haproxy
    group       haproxy
    daemon

    # turn on stats unix socket
    stats socket /var/lib/haproxy/stats

defaults
    mode                    http
    log                     global
    option                  httplog
    option                  dontlognull
    option http-server-close
#   option forwardfor       except 127.0.0.0/8
    option                  redispatch
    retries                 3
    timeout queue           5m
    timeout connect         5m
    timeout client          5m
    timeout server          5m
    timeout check           10s
    maxconn                 50000

listen stats
    bind :9000
    mode http
    stats enable
    stats uri /
    monitor-uri /healthz

frontend ida-fe-https
    bind :443
    default_backend ida-be-https
    mode tcp
    option tcplog

backend ida-be-https
    balance source
    mode tcp
    server ida01 <your first node IP>:<HTTPS port> check
    server ida02 <your second node IP>:<HTTPS port> check